MY ONE ENTRYWAY CHALLENGE
It's been a long time coming, but I finally finished my entry entryway. I've said this about a few things in my apartment, but I honestly do not think that a woman was on the decision making team when it came to the design of this space. If I were on the team, I would have turned this space into a coat closet where I could also store things like my vacuum cleaner, mop, watering cans, etc. - but for some reason they decided on adding this awkward bench where I'm assuming they thought that people would sit here and put on/take off their shoes. I've never done that once, and I also wouldn't want the first thing that guests saw when they walked in was a bunch of shoes.
So for a couple of years, this space has been blank/empty (and pretty dark because I don’t get any light in this area) because I really didn't know what to do with it. However, with all of the extra time at home, due to the pandemic, I decided to challenge myself and finally make a design decision on what to do in this awkward area.

I have been coveting this Gucci wallpaper for the longest time, but because it is $450 a roll I opted to go a MUCH cheaper route. I found the wallpaper below on Etsy for only $50 and it is perfect. The paper is super thick and of high quality, and I couldn’t be happier with it.

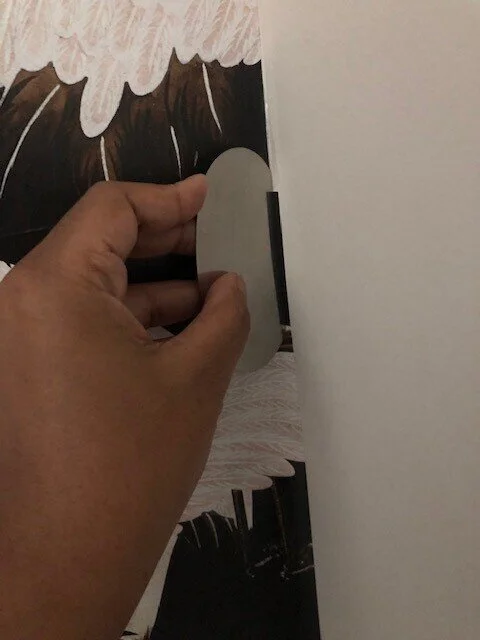
However, I thought that the paper would come as a peal and stick because it said it was removeable and perfect for apartments and temporary spaces - but unfortunately I found out that the only way to hang this specific paper was to use paste. Since I live in a rental, and did not wan to damage the walls - I decided to do some research for how to hang the paper in my space. Pinterest to the rescue! I went out and bought 2 rolls of painters tape and 3 rolls of double-sided sticky tape. As you can see below, I covered the wall in the painters tape first - and then adhered the double-sided tape directly onto the painters tape. This way, once I move out - I can peel the paper down without doing any damage at all to the wall.


Once both pieces of tape are up on the wall, now you can apply your paper on top. This part was super easy…

…until I got to the part where I had to match up the design and cut the paper to fit into remaining areas. Pro tip: measure 50 times, cut once. lol!!!


THE ART
Because the wallpaper was so graphic, I decided that I wanted to add more sculptural pieces vs printed art.

I posted about a piece I saw on IG, also seen here, so I decided to do a little DIY project. I purchased some very old fishing rope on Etsy, cut it into 4 equal-sized pieces, tied a double-knot at each end, and then tied all of the pieces into one single loose knot. And that’s it. Art! I really like how it turned out and I love the texture in the space.


THE LIGHTING
Finally, in this space, the builders added in the very generic boob light which I hate. I know they have a purpose, but I do not like them and I have changed them out in every apartment I’ve ever lived in. I wanted something that would be the cherry on top of the icing on the cake. I wanted something that would compliment the space as well as flow well with the entire apartment. I found this vintage light on Etsy, and when I say it is perfect for this entryway - it is per-fect!

For a good 2 months I had every intention of hanging it myself - but once I realized that the ceilings were too high, and that I didn’t have access to a ladder - just last week I hired a handy-woman to come hang it for me. Why I didn’t do this weeks ago - I don’t know.


Isn’t it amazing? I just love it. Also, I kept going back and forth whether or not I should paint the vent black or not - I’m glad I decided to paint it. It helps to fade it into the background a bit.
PULLING IT ALL TOGETHER


Like I mentioned above, I don’t get any light in this space, so it was hard to capture pictures that accurately depict what I see when I’m standing in the space - but these at least give you a glimpse into what I’ve been working on over the quarantine. I really do like how it turned out and am anxious to see what you think. Please leave a comment because I want to hear from you. To all my newsletter peeps - THANK YOU for all of your suggestions and guidance along the way. Those who have been with me throughout this process - I really want to hear what you think. Thanks all - love you guys!
